Monday, December 29, 2014

How To Fix KitKat SD Card Write Restriction

In the last days Samsung has been pushing out Android 4.4.2 to flagship devices like the Galaxy Note III and Galaxy S4. Unfortunately, Google implemented an SD card write restriction in the latest Android version which can be quite annoying for users with an SD card in their phone.

The new “feature” basically restricts apps from writing to external SD cards. This can be quite annoying, because many users want to store apps on a secondary SD card instead of the main storage unit.

Luckily, fixing this problem can be easily done if you have root access. Here’s how you can do it (Please be aware that you’re performing these changes on your own risk!):

Make sure that you have root access
Perform a NANDROID backup to be completely safe
Use a root-enabled file manager and navigate to /system/etc/permissions
Edit platform.xml and find “WRITE_EXTERNAL_STORAGE“
Add an additional group definition for this permission: <group gid=”media_rw” />
Save the changes and restart your device
You are now able to write on your external SD card again

I hope that I was able to help you.

Wednesday, November 12, 2014

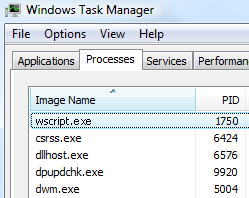
What is wscript.exe and how to remove it?


wscript.exe - Windows-based script host by Microsoft


What is wscript.exe?


wscript.exe is a Windows service that allows you to execute VBScript files. Normally, it is not dangerous, but if a malicious script is downloaded and executed it will appear as if wscript.exe is the culprit, when it is really a separate .vbs file. Antivirus programs usually detect C:\Windows\System32\wscript.exe as the culprit, however, it's not necessarily infected. It may be that your computer is infected with Worms and Trojans that attempt to execute malicious .vbs scripts. Most users, get these malware infections from SD cards, pen drives and of course infected websites. Malicious files may change Windows registry, establish connection to remove servers controlled by cyber crooks and download additional malware modules. Other issues: can't open Regedit, certain Windows options are missing, can't acces Contol Panel. Malware may also block anti-malware and Windows system utilities. You should not delete wscript.exe manually, many Windows services require it and our computer may not function properly if it cannot be found. But you should use recommend anti-malware software to remove wscript.exe related malware from your computer.

Notepad auto opens on boot?[.shellclassinfo]"localizedResourceName=%SystemRoot%\system32\shell32.dll,-21787]

[.shellclassinfo]"localizedResourceName=%SystemRoot%\system32\shell32.dll,-21787]

[.shellclassinfo]"localizedResourceName=%SystemRoot%\system32\shell32.dll,-21787]

Cause

NOTEPAD editor opens up with a file DESKTOP.INI that contains the above line

Occuring when

After installing Radar and rebooting the computer

Solution

  1. Click Start - All Programs.
  2. With the right mouse button click "Startup"
  3. choose open "Open All Users"
  4. delete the file 'DESKTOP' from this window.
  5. Click Start - All Programs.
  6. With the right mouse button click "Startup"
  7. choose open "Open"
  8. delete the file 'DESKTOP' from this window.
If, having done this the desktop.ini file still opens next time you reboot, do the following:
  1. Click on Start
  2. Click on Run
  3. In the text box, type msconfig
  4. Click on OK
  5. The System Configuration Utility window will display
  6. Click on the Startup tab
  7. Look for the file in the list of Startup Items and untick the box next to it.

Notepad auto opens on boot?

This happens if the Hidden attribute for the desktop.ini file is somehow removed. Follow these steps to resolve the problem:

Open an elevated Command Prompt window. To do so, click Start, click All Programs, click Accessories, right-click Command Prompt, and then click Run as administrator.

Type the following commands below and press ENTER after typing each command.

(You may copy the text below and paste it in the Command Prompt window.)

attrib +s +h "%appdata%\Microsoft\Windows\Start Menu\Programs\Startup\desktop.ini"

And then run the following command:

attrib +s +h "%programdata%\Microsoft\Windows\Start Menu\Programs\Startup\desktop.ini"

Type EXIT and then press enter to close the Command Prompt window.

Hope this information is helpful. Please let us know if you require further help.

Saturday, October 25, 2014

Airtel 3G free 500MB data tricks- How to activate


Airtel india offering free 3G data for all prepaid and retail postpaid customers by updating your contact details to airtel official database. This free Airtel 3G data tricks offer only 500MB of instant credit to the 3G data balance with 7 days of validity exclusive for prepaid users.
To get this free airtel 3G tricks just follow this below steps carefully.

Activate Airtel 500MB free 3G:

Method 1: For Non Airtel 3G Dongle user:
Copy this link https://www.airtel.in/myaccount/NavigationApp?num=MobileNo. and paste to browser address bar and change Mobile No. to your 10 digit airtel number the hit enter.
Or
else open this https://www.airtel.in/myaccount/NavigationApp/home.action link and enter your mobile number then click submit button.
Airtel-3G-free-tricks
In next step click radio button “No, I don’t have a password, please help me get a One Time Password (OTP)” in case you don’t have password to login and you will get an OTP 4-digit number to your mobile immediately.
Enter OTP number and click “Submit”.
In next page get your MSISDN code by pressing ‘+do more’ button and click “transaction details
airtel-3g-500mb-free-tricks
In new window open with the MSISDN Code For eg –DN5564A9998DF65BF47Q86 in address bar then copy that number
Now paste that code to this link https://www.airtel.in/account/3gDongle/quickLink.jsp?msisdn=XXXXXXXXX (XXXXX is replace with your MSN code)
Now open this link and get Airtel 3G data offer image in right side and click update with your mobile number and Email ID
Now you will receive an OTP to your alternate mobile number.
Finally hit submit then wait for 5 min and check 3G data by using USSD *123*11# and enjoy 500MB of free 3G data for 7 days.
Note: Don’t worry about if you get message like “your request has not been registered”.
Method 2:
If above trick doesn’t work then go with this alternative tricks
Open this link http://3gdongle.airtel.in/ in your smartphone or 3G dongle using Airtel 3G or 2G data connection.
airtel-3g-500mb-free-tricks2-working
You will get window like this then hit add alternative contact detail and enter mobile no and Email ID to receive OTP to your mobile
Enter OTP to text box then hit enter that’s it now you will get 500MB free Airtel 3G data for 7 days of validity.
Feel free to share airtel free 3G mobile data tips to your social friends..

All secret Android codes, tips and tricks for your Android mobile devices.

CELLPOINT

          Secret Codes                                                        Functions/Description
  • *#06#                                       To check IMEI of your device, enter this code.
  • *#0*#                                       To enter service menu on the very new Android phones.
  • *#0228#                                   To check battery status.
  • *#9090# / *#1111#                  To make device in Service mode.
  • *#*#4636#*#*                        To get information about battery, usage statistics and device.
  • *#*#34971539#*#*                 To get all information about camera.
  • *#12580*369#                         To get software and hardware info.
  • *#228#                                     For ADC Reading.
  • #7353#                                     To hide test menu 2/Self Test Mode.
  • ##7764726                               To hide service menu for Motorola Droid.
  • *#*#273283*255*663282*#*#*   For backup of our all media files.
  • *#*#232338#*#*                       It display the Wi-Fi mac address.
  • *#7465625#                               To view status of lock-phone.
  • *#*#3264#*#*                           To show RAM version.
  • *#*#44336#*#*                         To display build time and change list number.
  • *#*#232337#*#                         To see or display device’s Bluetooth address.
  • *#*#197328640#*#*                 It enables test mode for service.
  • *#*#8351#*#*                           To enable voice dial mode.
  • *#*#8350#*#*                           To disable the voice dial mode.
  • *#*#0842#*#*                           To test Back-light/vibration.
  • *#*#2664#*#*                           To test the touch-screen.
  • *#*#0289#*#*                           For Audio test.
  • *#*#0*#*#*                               For LCD display test.
  • *#*#232331#*#*                       To test Bluetooth of any Android device.
  • *#*#0283#*#*                           To perform a packet loop-back test.
  • *#*#1575#*#*                           For advanced GPS test.
  • *#*#1472365#*#*                     To Perform a quick GPS test.
  • *#*#0588#*#*                           To perform a proximity sensor test.
  • *#*#7262626#*#*                     To perform field test.
  • *#*#232339#*#*                       Testing Wireless LAN.
  • *#9090#                                     To Diagnose configuration of device.
  • *#872564#                                 To control U-S-B logging.
  • *#9900#                                     System dump mode. 
  • *#*#7780#*#*                           Reset  to factory state.
  • *2767*3855#                             To format Android device.
  • *#*#4986*2650468#*#*          To get pda, phone, H/W and RF Call Date.  
  • *#*#1234#*#*                            To know about pda and firmware version.                                      
  • *#*#1111#*#*                           For FTA Software version. 
  • *#*#2222#*#*                           For FTA Hardware version.
  • *#*#7594#*#*                          To change power button behaviour once code enabled.      
  • *#*#8255#*#*                           To launch Google Talk service monitor.

***Dont forget to Comment about it...

Saturday, May 31, 2014

Micromax A72 Canvas Viva Hard Reset

Hard Reset:

         First you need to download  SP Flash Tool from billow link
         & follow the Instruction . 
  • Download Tool and Driver
  • Open SP Flash Tool and Select Scatter-loading file
  • Use same version file (same color)
  • Now click Download and click yes
  • Now switch off handset and connect to PC with USB data cable
  • Now install driver quickly
  • After install driver download to phone not start then disconnect phone and reconnect to PC again
  • Now User data image file download and hard reset done
  • Any problem contact US.
          More Instruction :
      
Open sp tool
select scate file for your mobile
click download
now click on yes
now switch off handset
now connect handset with usb (remember set must be switch off)
now its ask for driver
install driver
now downloading start automatic
if downloading not start after install driver then remove and reinsert usb cable
now your handset flash with user data and remove all locks.